6/24/2013

From Useful to Useful Again

      On top of being a regular phone, smart phones can act as a camera, a voice recorder, an alarm clock, a game console device, an MP3 player, PDA, as well as be able to connect to the internet like regular laptops.  So many people have smart phones and only have to keep track of one wire.  For me, I still own a simple cell phone.  I have a point-and-click camera and a 3DS with their own individual chargers and USB connector.  I needed a way to organize these wires so they don't wind up "inseparable".

This should keep them from tangling.

       I got this idea from my brother who has a shoebox with toilet paper tubes storing his individual wires.  I thought I could do the same, but decorate it too.  Here's a tutorial for anyone curious as to how my cousin and I went about it.

~*~*~*~*~*~

Tube Containers

We forgot the scissors.  And other things.

Tools


  • toilet paper tubes
  • scissors
  • pencils and eraser
  • markers and colored pencils
  • glue
  • construction papers


Steps

  1. Cut a construction paper evenly in half hot-dog style.
  2. Hotdog styleHotdog style
  3. Cut the same construction paper evenly in half again, hamburger style.  The length of the paper should be enough to cover a single toilet paper tube.
    Hamburger style
  4. Fold the paper in half.  Crease the fold and then unfold the paper.
    It's the easier steps.
  5. Fold one end of the paper to the middle and then crease it.
    A little more difficult, I guess.
  6. Do the same to the other side and then fold the whole thing in half.
    Sweating yet?Almost there!

    Thank goodness that's over!
  7. Using a pencil, draw a design you want to cut out.  I used half circles on the edge to create full circles when the paper is unfolded.  
    I added hearts to the other edge.
  8. Cut out the design and then unfold the paper.
    Be carefulIt turned out nice!
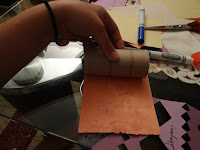
  9. I layered the paper on top of another that was not designed, then glued them together.
    Orange seems like a nice background color.I haven't experimented with liquid glue.

    The papers are a bit stiff.
  10. Using markers and colored pencils I decorated the papers.  You can use whatever decorations you'd like (stickers, collage, etc.). 
    It came out well! :D
  11. After decorating it, glue the construction papers to the toilet paper tube. If you're using a glue stick, make sure to tie a rubber band around the whole tube and wait a day before removing the band.  This will ensure that the glue dries on the tube and won't come off easily.
    Don't let the glue dry on the papers!

    Yarn and wires and a fish line
  12. Carefully fold your wires and place in the tubes and voila!  A newly decorated tube container is pretty and ready to hold your wires!
    Yay!  First tube done!The other side


I hope yours turned out well too, if not better!

6/17/2013

Growing a Garden


They look like little trees from this angle!

      My cousin Jem and I started on a garden in our backyard where we planted our 36 tomato plants that we grew from seeds.


      The plants started out looking like the pictures below!  (Each little container had 3 or 4 seeds, and later, we had to cut all except the strongest looking one in each pellet).

They are thirsty little creatures.

      With each day, the plants grew taller.  It was time to make some space in the backyard so that they could grow taller still.


      My dad, Jem, and I started digging a plot of land next to the garage. After a couple or so hours of hard work, we were finally able to remove the grass, large stones, and weeds.  The soil was loosened and mixed with fertilizer before Jem and I planted the tomatoes in the ground.


      We put up fences so that rabbits won't try and each the plants.  After 6 to 7 hours of digging and planting, we were satisfied with how the garden turned out.  This is Jem and my first time creating a garden with our bare hands out of scratch, so Jem makes sure that the plants are watered everyday and I see to it that they are growing vertically alright.  With love and hard work, I hope our garden prospers.      


Some Seeds for the Birds

Birds in the summer need a safe place to hang out too.

      My cousin Jem and I were able to start in making the backyard feel a little more home to our avian neighbors.  At Menards, Jem and I took about an hour choosing the bird feeder that satisfied our criteria: metal- or wood-make, has perches, not too slender nor too big, and has big holes.  We settled with the one in the picture, and decided that we'd stick barbeque sticks to make the perches.  We also bought a stand, bird seeds, and a bird bath to go along with the bird feeder.  We set it up by the big bush-tree situated in the corner of the backyard.  The birds will feel safer that the bird feeder is nearer their home rather than far away from cover.  We can't wait until lots of birds come visit.

6/12/2013

Removing Nail Polish is Harder than I thought

      Sally Hansen's new summer nail polish line looks great when applied "correctly"!  The only problem is removing the layers of texture-polishes.

      The tutorial will have to wait until I can successfully remove enough nails for a neat looking video.  Sorry for the inconvenience, but I hope it is worth the wait.

6/10/2013

Sally Hansen Fuzzy Coat and Sugar Coat

      The Sally Hansen new summer line of nail polish bottles that were displayed in their carton shelves at Wal-Mart looked so cool that I went ahead and bought 2 different colors of the Fuzzy Coat and 1 of the Sugar Coat.    

      I'm not one to actively paint my nails, but the colors were so appetizing that I wanted to at least try them on to get into the spirit of summer fun.  After I got home from the store, I immediately tried them on.  It was difficult at first, but after a few tries, I finally gotten the hang of it.  The picture below is my third attempt at applying the nail polishes.  It turned out great for an amateur nail polish applier (me)!


Absolutely fantastic.

Super fun and cool textures
Alternating from the left to right:  Fuzzy Fantasy (Fuzzy Coat),   Cherry Drop (Sugar Coat), repeating.

   
Second take
Same as the photo above, except in reverse order.

      An amateur's tutorial to applying these nail polishes will be up soon if anyone is curious or irritated about how to put them on as "neatly" as I did.

Introducing Stuff! (to come)

Hey Everyone!

      It's been a long time, and I finally got around to starting a blog about my interests.  It's probably going to be a little disorganized since I don't know how to format this so-called blog, but I do want to show off and also post amateur tutorials of my activities!

      I hope you somehow find what you are looking at useful or entertaining, at the very least in the long run!

"Today is life-the only life you are sure of. Make the most of today. Get interested in something. Shake yourself awake. Develop a hobby. Let the winds of enthusiasm sweep through you. Live today with gusto." -Dale Carnegie

      See you guys again soon with more posts.